
Battle of El Alamein
October 1942
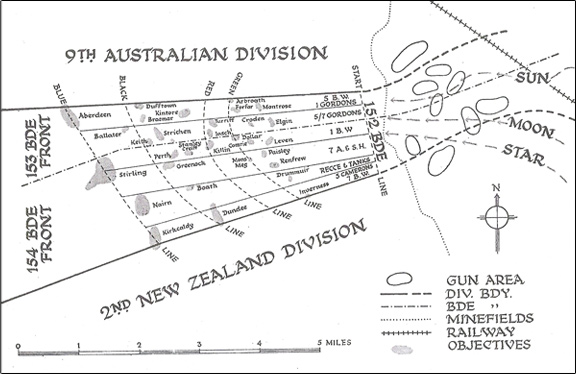
Diagram El Alamein Operations
show infoDescription:
Diagram of the area of operations of 152 Brigade at El Alamein, North Africa, October 1942.
Tags:
An Outline of the Battle
The Plan Montgomery was determined to attack the enemy using his infantry to create a gap and then push the armour through the gap created. The area for this was not the weaker sector in the south but the stronger part of the enemy position in the North. 30 Corps were to execute this attaching on a frontage four divisions wide.
The 2nd New Zealand Division were on the 51st Highland Division left and the 9th Australian Division were on their right. To the south beyond the New Zealand Division was the 1st South African Division. Once on their objectives the 1st Armoured Division would pass through them.
The Divisional Deployment
The 51st Highland Division would assault two brigades up, 154 Brigade on the left, 153 Brigade on the right with 152 Brigades behind.
Preparation
The Division was moved forward in preparation for the attack into defensive "boxes" 25 miles east of El Alamein.
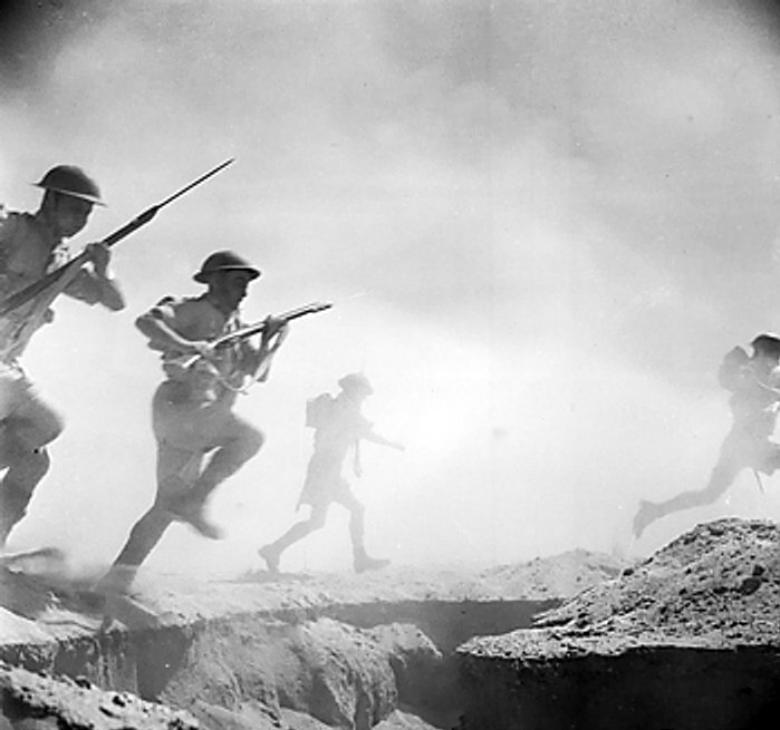
El Alamein Infantry
show infoDescription:
British Infantry advance during Operation Lightfoot - 24th October 1942.
Credit:
Photographer : SGT Chetwyn, No1 Army Film & Photography Unit
Copyright:
IWM E 18474
Tags:
The Attack
The attack commenced on the night of 23/24 October. From the Start Line facing west there were a number of report lines, Green, Red, Black and Blue. These would help to control the artillery fire and monitor the progress. Within various objectives were names with Scottish place names like Perth, Inverness, Keith and Aberdeen.
These four lines were to be taken in three attacks with reorganisation taking place between each attack. A brief summary of the actions of each battalion the from the left is as follows:
- 5th Camerons - 5th Camerons moved forward to take Inverness and go firm on the Red Line. On the 24th they went into reserve in 154 brigade before taking part in the "Supercharge" Force.
- 7th Black Watch - The 7th Black Watch passed through the 5th Camerons once firm on Red Line and capture "The Ben", a piece of high ground on the end of the Miteirya Ridge. Successful, they reorganised on the Black Line and were relieved by South African on the 31st October.
- Recce Regiment and tanks - 51 Recce Regiment and the armour of 50 Royal Tank Regiment moved through their sector supporting the engineers clearing mines right up to the objective Nairn.
An extract taken from The Queen's Own Highlander magazine issue commemorating the 50th Anniversary of El Alamein, describing the 5th Camerons' initial advance and the use of the Company Piper, Donald MacPherson, to alert the advancing Black Watch of their friendly status.
Citation for the first of two DSO awarded to Major (temporary Lieutenant Colonel) James Alexander Oliver MBE of the Black Watch (Royal Highland Regiment). This first DSO is in recognition of his 'outstanding example' in the attack on the Miteriya Ridge on the night 23/24 October, 1942
Account of the opening Artillery fire by 128 Field Reg. RA by R Gorle MC.
An Account of El Alamein from 'A Brief History of 51st (H) Reconnaissance Regiment (1941 -1943) and its Involvement in the Desert Campaign'.
- 7th Argylls - The battalion moved through the minefields taking Paisley and Renfrew by 1100hrs and then Mons Meg. From there they moved on to the Red line reaching it by midnight. At 0100hrs they continued their advance taking and consolidating on Greenock. Subsequently they captured Nairn. On the 30th October they were relieved by South Africans.
Detailed notes on the Battle of El Alamein from the 7th Argyll & Sutherland Highlanders. (North Africa, October, 1942)
- 1st Black Watch - 1st Black Watch took Leven then Dollar and pressed on to Killin on the Red Line. After 11 days they were relieved.
- 5/7th Gordons - The Battalion moved forward rapidly, having to wait for the barrage to lift on one occasion, and took Elgin and Cruden before successfully occupied Green Line and pressed taking Insch and Turriff and on to Red Line. This was secured and part of the battalion went on to Black Line. From here the 2nd Armoured Brigade exploited through.
- 5th Black Watch - The battalion advance reached their objectives and 1st Gordons passed through as planned. The Battalions was relieved on 2nd November. As rear battalion of the brigade they prepared to assault a position at Mirbat-Kamli but having been told the enemy had withdrawn they then came under heavy fire losing number of casualties and tanks. Over the night of 3/4th November they were moved forward to the abandoned Daba Airfield.
- 1st Gordon - They set off 20 minutes behind 5th Black Watch and passed through them. The Battalion's objective was Black Line but they ran into an unidentified mine field and heavy resistance. They dug in and at daylight and armoured battle between the Bays and the Germans took place. Two companies took Braemar. The following night the battalions attempted to take Aberdeen but without success. However the next night it was taken. The battalion was withdrawn on 1st November.
During the initial stage of the action the 2nd Seaforth had been the Corps Reserve. However on 24th they were given back to the division and were pushed forward through 1st Black Watch to form a bridgehead to launch 2nd Armoured Brigade. This they did resolutely and with serious losses for 36 hours.
The following account of the Battle of El Alamein comes from the personal account of Colonel John Sym DSO who was 21C of 2nd Bn. Seaforth Highlanders. Extracts cover 23/24 Oct and 1/2/3 Nov during Operation Supercharge.
Captain John Lang served with 128th (H) Field Battery RA (TA). He was at El Alamein and this is his personal account of the action between September and November of 1942 in North Africa.
An extract from the memoirs of Driver MacAskill provides a fascinating account of the logistic support at El Alamein, Oct '42.
Supercharge
On the 30th October, 152 Brigade, with 151 Brigade from 50th Division, were attached to the New Zealand Division to make a punch into the German line, which would then be exploited by armour. The operation was called "Supercharge". The plan was for the two brigades to advance on a 4000 yard frontage, 4000 yards into the enemy south of the Australian Division. In the early hours of 2nd November the attack was launched. The attack went according to plan and all objectives were taken by 0600 hrs. The enemy counter attack later on 2nd November was repulsed. 152 Brigade attacked again and by the 3rd November the enemy were withdrawing.
Operation Supercharge was the name given for the start of the break out operation that was launched on 2nd November.
Conclusion
The battle concluded on the 3rd November with the 7th Argylls of 154 Brigade taking the strong point of Tel El Aqqaqir to find that it had been abandoned by the enemy.